Britecheck's New "User Roles" Feature For Role-based Inventory Data Access
June 28, 2021
If you own a business or manage a team, you know well enough that sometimes a staff member’s functions can go beyond department borders. For instance, a supply chain planner can find themselves working with production, warehousing, logistics, and customer service teams all at the same time. Such personnel need access to a wide range of data points to perform their duties seamlessly.

However, for employees with specific functions confined within departments, it makes more sense to restrict access to the information relevant to them. In addition to upholding data integrity, selective access reduces the amount of information staff members have to sift through to find what they need.
When enforcing role-based access, simply telling your employees what to access is not enough. You need an autonomous control system to keep them on the right track. Fortunately, comprehensive inventory management solutions like Britecheck come with role-based access control features that you can use to ensure the right people access the right inventory information.
Read on to uncover the importance of role-based access and how Britecheck’s “User Roles” feature can give you better control of your inventory data.
What is Role-based Inventory Data Access?
Role-based data access is a system that allows data administrators to restrict information access to authorized users, depending on their roles. Configuration starts with creating roles, which determine the permissions granted to the user. Once an employee is assigned a role, they can only access the information their role allows. Full control is reserved to the administrator, who can view and edit all the inventory data in the system and grant or revoke access when required.
Access control is not about concealing information from your employees. Rather, it is about giving your employees access to the information they need with a platform that narrows their focus and makes them accountable for their specific data.
How Does Role-Based Access Control Benefit Your Business?
Inventory management apps with role-based data access functionality enable managers and business owners to give their employees access to just the information relevant to their line of work.
Below are three primary benefits of controlling your company’s stock data access with an inventory app.
1. Increased Productivity
Controlling inventory data access may sound like a disadvantage for employees, but on the contrary, it can do wonders for general productivity. Restricting access to just relevant information makes the data more concise and easier to digest. Staff members spend less time looking for the right information, freeing up more of their workday for more meaningful activities.
2. Reduced Administrative Work
For system administrators, using roles to define permissions makes it easy to give users the access they need. When a new employee joins the company or shifts roles, the IT team does not have to create a new account with user-specific permissions from scratch. Instead, they can assign a role to the account, and the necessary permissions will automatically apply.
Therefore, the employee can assume their duties as quickly as possible, rather than wasting valuable time waiting for their account’s permissions to be configured.
3. Improved Security
Arguably the most obvious benefit of restricting data access is that it reduces the chances of data loss or misuse. By confining access to user roles, managers can rest easy knowing their data is only being viewed, downloaded, or edited by pre-authorized personnel. Staff members outside the department in question cannot interfere with the data, knowingly or unknowingly.
Having a tighter circle of users authorized to access certain data also minimizes the chances of data leaks. Giving few users access to sensitive inventory information means reducing the number of devices through which criminals can access your data. Furthermore, if a leak occurs, you can begin to address it from the authorized users rather than the whole organization.
How To Assign and Manage User Roles With Britecheck
Britecheck is the ultimate inventory solution for user roles. The app’s interface is built to offer optimum security and accountability without compromising usability. You can restrict specific user access to just what is relevant to them, saving them access time while protecting sensitive company data.
As the administrator, you can define user roles on your Britecheck platform with a few easy steps. These are outlined below.
1. Login to Britecheck
The first step toward taking advantage of all Britecheck features is logging into the platform. If you do not have an active account, you can register for a 14-day free trial here.

2. Go to User Roles
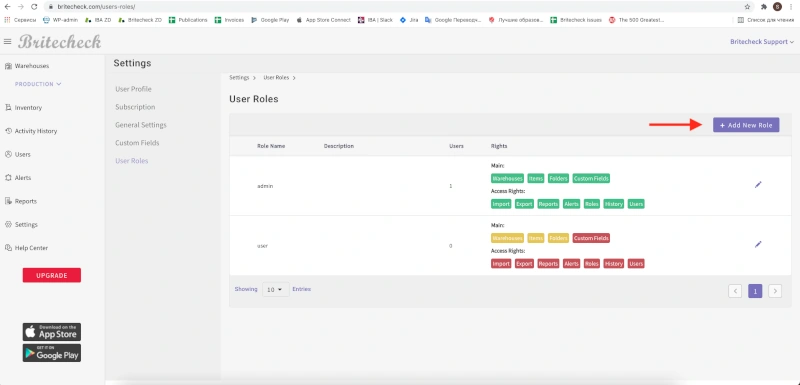
To access the User Roles section on Britecheck, click Settings and then go to User Roles. The User Roles menu will open on the right, on which you will see at least two standard roles available for use: Admin and User.

The Admin role has complete access and control of your inventory data. They can create, view, edit, and delete warehouses, folders, categories, reports, alerts, and activity history. Meanwhile, the User’s rights are restricted to viewing warehouses, folders, and categories, and creating new categories and items.
3. Add a Custom Role
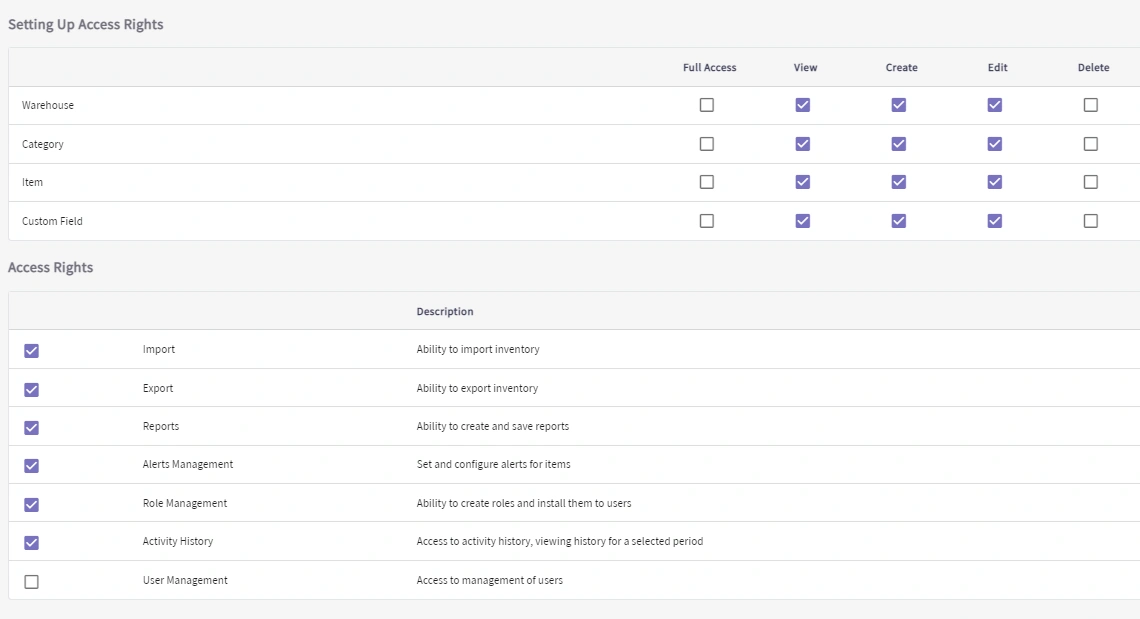
To add a custom user role, Click Add New Role. On the resulting page, give your new role a name and description, and then select the permissions you would like to associate with the role.
Many inventory apps stop at the simple “View”, “Edit”, “Create”, and “Delete” rights, but Britecheck takes things a notch higher by enabling you to specify the actions you can allow. For instance, you can grant a user the “Edit” rights but only allow them to import and not export data.
4. User Assignment
Once you have created a role, click the “Users” tab and go to “Add Users”. Typing the first few letters of the user’s name displays suggestions for speeding up your search.
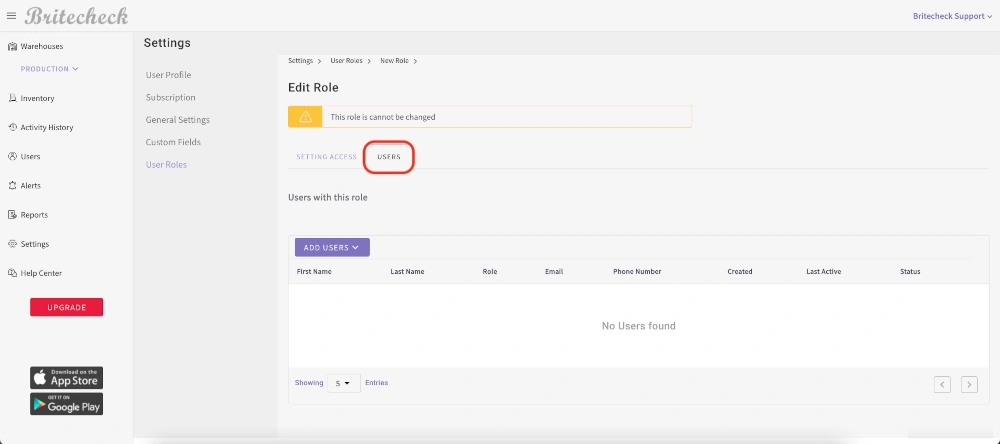
If you cannot find a user, click the three lines at the top-left corner of their screen to reveal the primary Britecheck menu, and then click “Users.”

The details of all added users are displayed in the resulting Users Dashboard. You can add new users by clicking the “Invite User” button.
Once a user has been added, you can allocate them to a role by going back to the “User Roles” section and editing the role you want to assign.
Achieve Smart Inventory Data Role-based Access with Britecheck
As you have learned, implementing a role-based access control system for your inventory data can have a profound impact on productivity, efficiency, and security. It can also minimize the time it takes to onboard new staff members and configure the account permissions they need.
Britecheck’s new “User Roles” feature can give you better control of who accesses what inventory data. Whether you are new to Britecheck or have been using it since Day One, you will find creating new roles and assigning users to them quick and straightforward.
Take Britecheck's “User Roles” for a spin today and give your employees the easy and filtered access they need.